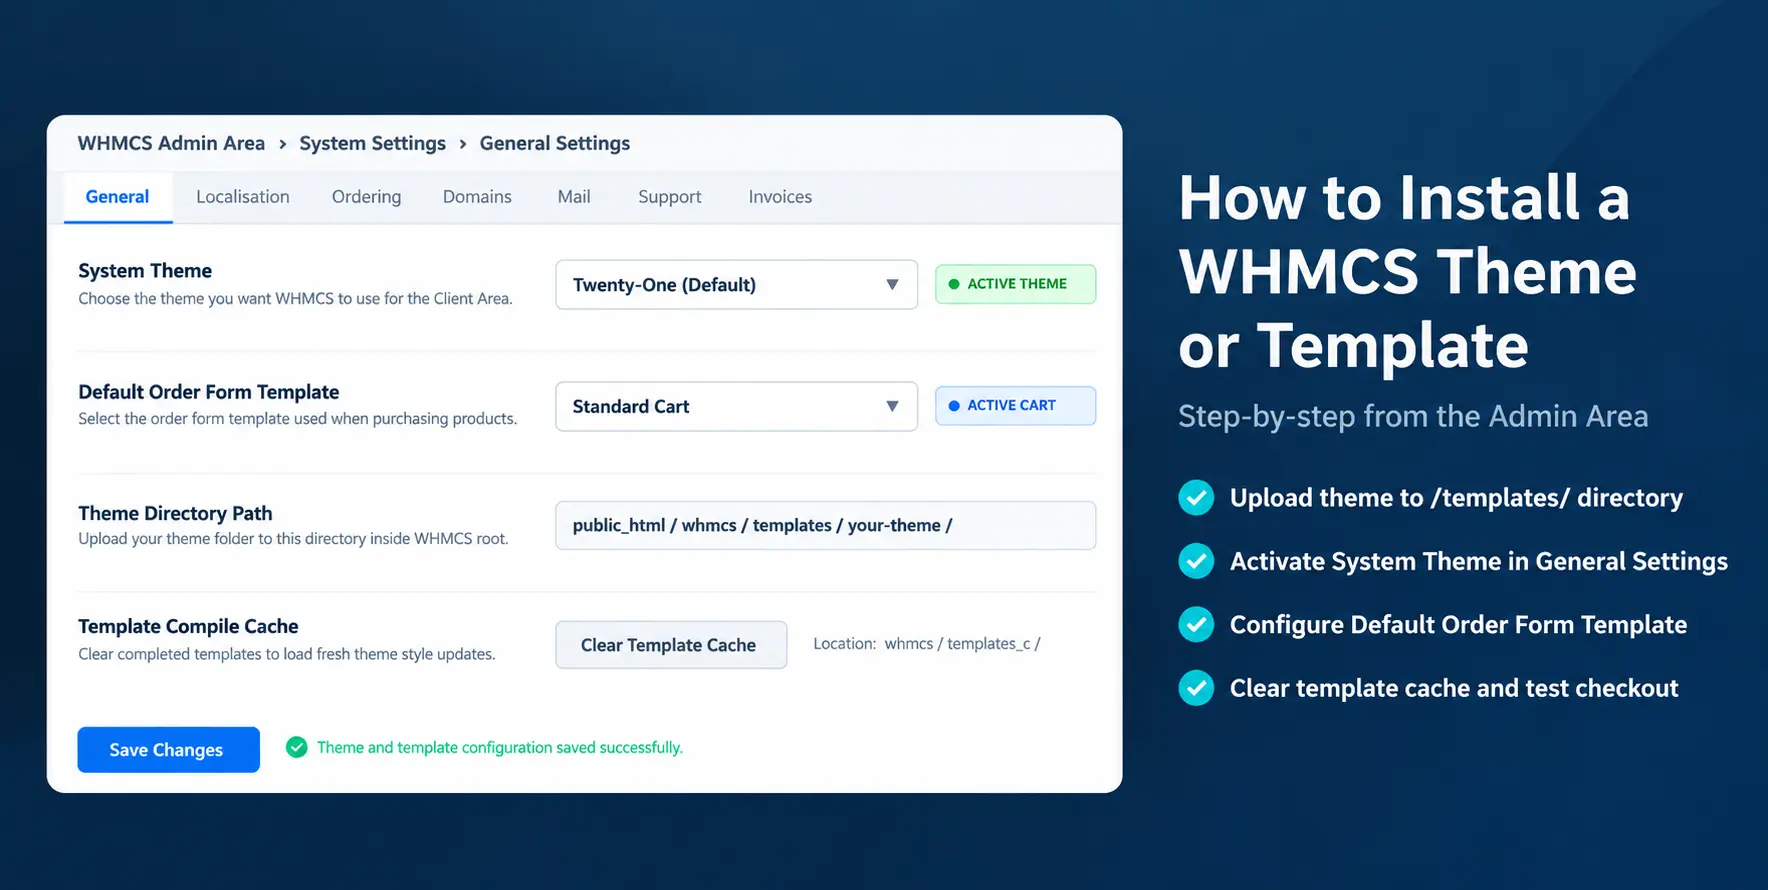
To install a WHMCS theme, extract the theme ZIP archive on your computer and upload the theme folder directly to your WHMCS
/templates/
directory. If the package contains order form templates, upload them to
/templates/orderforms/.
Next, log in to your WHMCS Admin Area, navigate to
Configuration > System Settings > General Settings,
select your new theme on the General tab under System Theme, and click Save Changes.
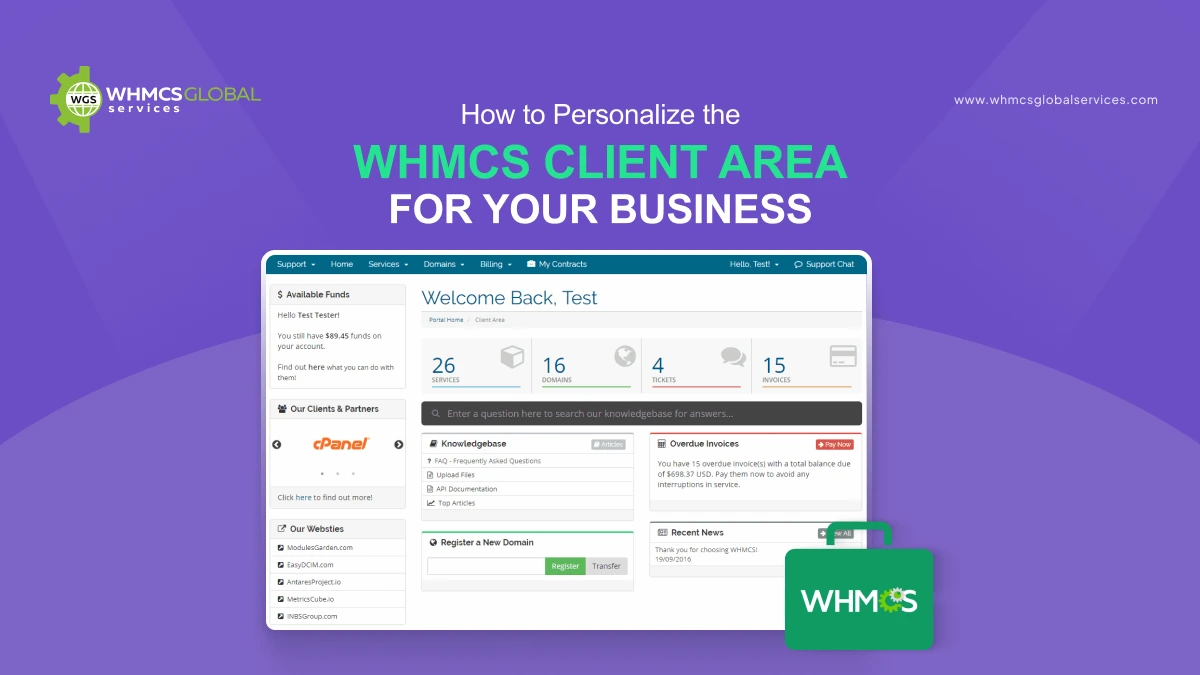
A WHMCS theme can change the look and feel of your Client Area and help you match WHMCS with your main website design. A WHMCS template can also be used to customize your order form and checkout experience.
Installing a WHMCS theme is usually simple, but the exact steps can vary depending on the theme. Some themes only include Client Area template files, while others may include order form templates, modules, language files, CSS, JavaScript, or other supporting files.
In this guide, we will explain how to install a WHMCS theme or template, how to activate it, and what you should check after installation.
Before Installing a WHMCS Theme
Before installing any new theme or template, check that it is compatible with your WHMCS version.
You should also create a backup of your WHMCS files and database. This is especially important if your current WHMCS installation contains custom templates, hooks, modules, or other modifications.
Most WHMCS themes are provided as a ZIP file. Extract the package on your computer and review the folders before uploading anything to your server.
Depending on the theme, you may find folders such as:
templates/
modules/
lang/
assets/
The folder structure can be different for each theme, so always check the installation instructions provided with the theme.
Step 1: Download and Extract the WHMCS Theme
Download the theme package from the theme provider and extract the ZIP file on your computer.
If You Purchased the Theme from WHMCS Global Services
If you purchased your WHMCS theme from WHMCS Global Services, log in to your WHMCS Global Services Client Area.
After logging in:
- 1. Go to My Services.
- 2. Find and click on your purchased theme.
- 3. Open All Available Downloads.
- 4. Download the latest theme package that matches your WHMCS version, PHP version, and IonCube version.
- 5. Extract the downloaded package on your computer before uploading the files to your server.
Always use the package that matches your current server environment. Using an incompatible version can cause installation or compatibility issues.
Look for the main Client Area theme folder. For example:
templates/
└── mytheme/
Some themes may also include additional folders for modules, language files, order forms, or other customizations.
Note: Do not change the folder names unless the theme documentation specifically tells you to do so.
Step 2: Back Up Your WHMCS Installation
Before uploading the theme, create a backup of your existing WHMCS installation.
Your backup should include:
- WHMCS files
- WHMCS database
- Existing custom themes
- Custom hooks
- Custom modules
- Custom language files
Having a backup allows you to restore your previous setup if there is a problem after installing the new theme.
Step 3: Access Your WHMCS Installation
You can access your WHMCS files using an FTP client such as FileZilla, your hosting control panel’s File Manager, or another file management method provided by your hosting company.
Open the directory where WHMCS is installed. For example:
public_html/whmcs/
Your WHMCS installation will normally contain directories such as:
admin/
includes/
modules/
templates/
vendor/
The exact structure can vary depending on your WHMCS version and installation.
Step 4: Upload the WHMCS Theme
If your theme contains a Client Area theme folder, upload it to the WHMCS:
/templates/
For example:
/templates/mytheme/
Make sure the theme folder is placed directly inside the templates directory. The correct structure should look similar to:
/templates/mytheme/
Avoid Nested Folders: Avoid accidentally creating a structure such as
/templates/theme-package/templates/mytheme/
if the theme requires the theme folder to be directly inside
/templates/.
The exact folder structure depends on the theme you are installing, so check the theme’s installation documentation before uploading the files.
WHMCS Theme Installation Guides
If you are installing a WHMCS theme from WHMCS Global Services, use the installation guide for the specific theme:
- HostX WHMCS Web Hosting Template – Follow the HostX installation guide.
- CloudX WHMCS Client Area Hosting Template – Follow the CloudX installation guide.
- ClientX WHMCS Client Area Template – Follow the ClientX installation guide.
- TwentyX WHMCS Client Area Template – Follow the TwentyX installation guide.
- AdminX WHMCS Admin Theme – Follow the AdminX installation guide.
These guides provide the product-specific file locations and configuration steps required for each theme.
Step 5: Upload Additional Theme Files
Some WHMCS themes include additional files apart from the main Client Area theme. Depending on the theme, these may include:
- Order form templates
- Addon modules
- Language files
- CSS files
- JavaScript files
- Image or asset files
- Custom hooks
Upload these files to the locations specified in the theme documentation. For example, an order form template is normally placed under:
/templates/orderforms/
Important: Do not overwrite existing WHMCS files unless the theme documentation specifically requires it. If a theme package contains files that need to replace existing files, make sure you have a complete backup before proceeding.
Step 6: Activate the WHMCS Client Area Theme
After uploading the theme files, log in to your WHMCS Admin Area.
- Go to Configuration > System Settings > General Settings (in WHMCS 7.x: Setup > General Settings).
- Open the General tab and select the System theme you have installed/uploaded.
- Save the changes.
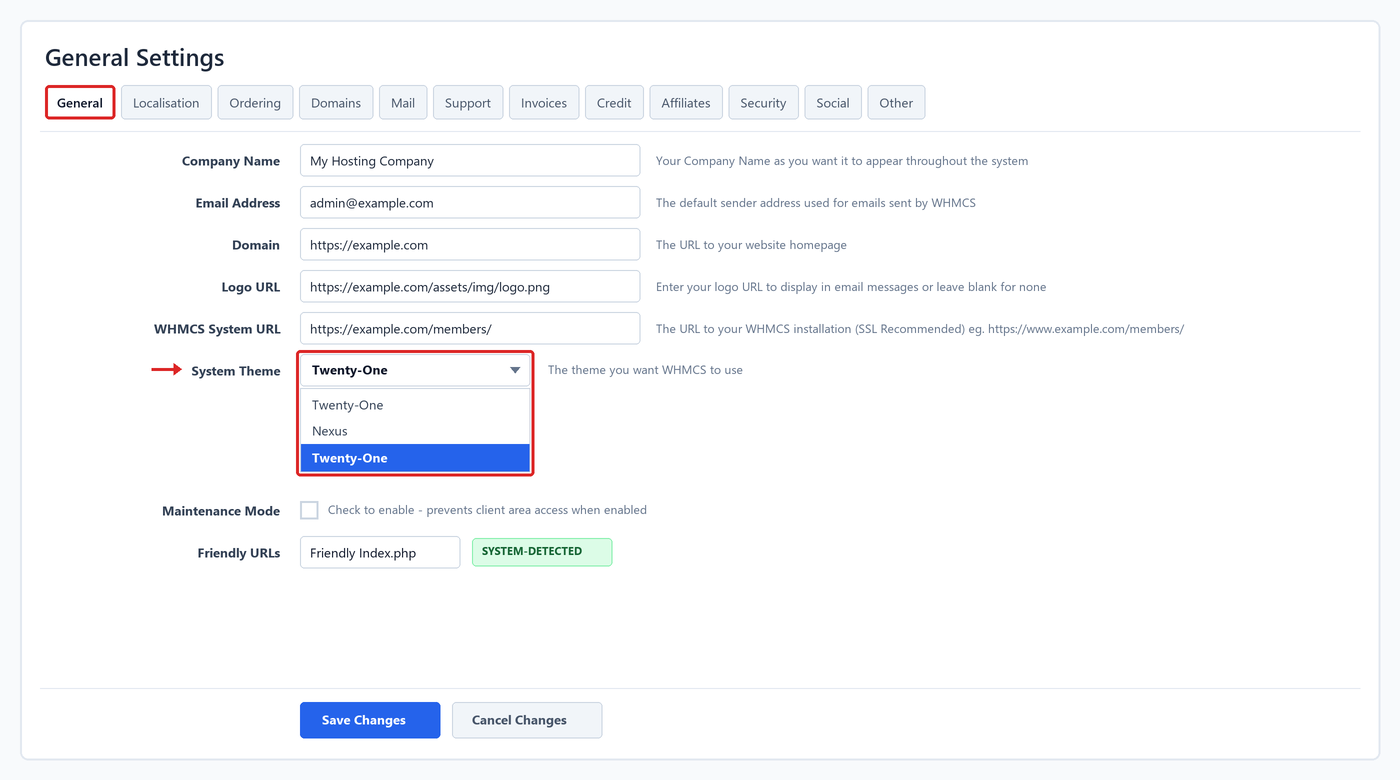
In the WHMCS Admin Area, go to System Settings > General Settings > General tab to select your System Theme.
Your WHMCS Client Area will now use the selected theme. Open the Client Area in your browser and check that the new design is loading correctly.
Step 7: Install a WHMCS Order Form Template
A Client Area theme and an order form template are two different things.
The Client Area theme controls the general appearance of pages such as:
- Client dashboard
- Services
- Domains
- Invoices
- Support tickets
- Account settings
- Profile pages
An order form template controls the product selection, configuration, shopping cart, and checkout experience.
If your theme includes an order form template, upload it to:
/templates/orderforms/
For example:
/templates/orderforms/myorderform/
Make sure the order form folder is placed correctly inside /templates/orderforms/.
One Step Checkout Templates
If you are using a WHMCS Global Services checkout template, follow the installation guide for your specific template:
- WGS One Step Checkout Template – Follow the One Step Checkout installation guide.
- VueJS + WHMCS One Step Checkout Order Form – Follow the VueJS + WHMCS One Step Checkout installation guide.
The product documentation should be followed for the correct file placement and configuration because different checkout templates may have different requirements.
Step 8: Select the Order Form Template
After uploading the order form template, log in to your WHMCS Admin Area.
- Go to Configuration > System Settings > General Settings > Ordering.
- Find the Default Order Form Template option.
- Select your newly installed order form template and save the changes.
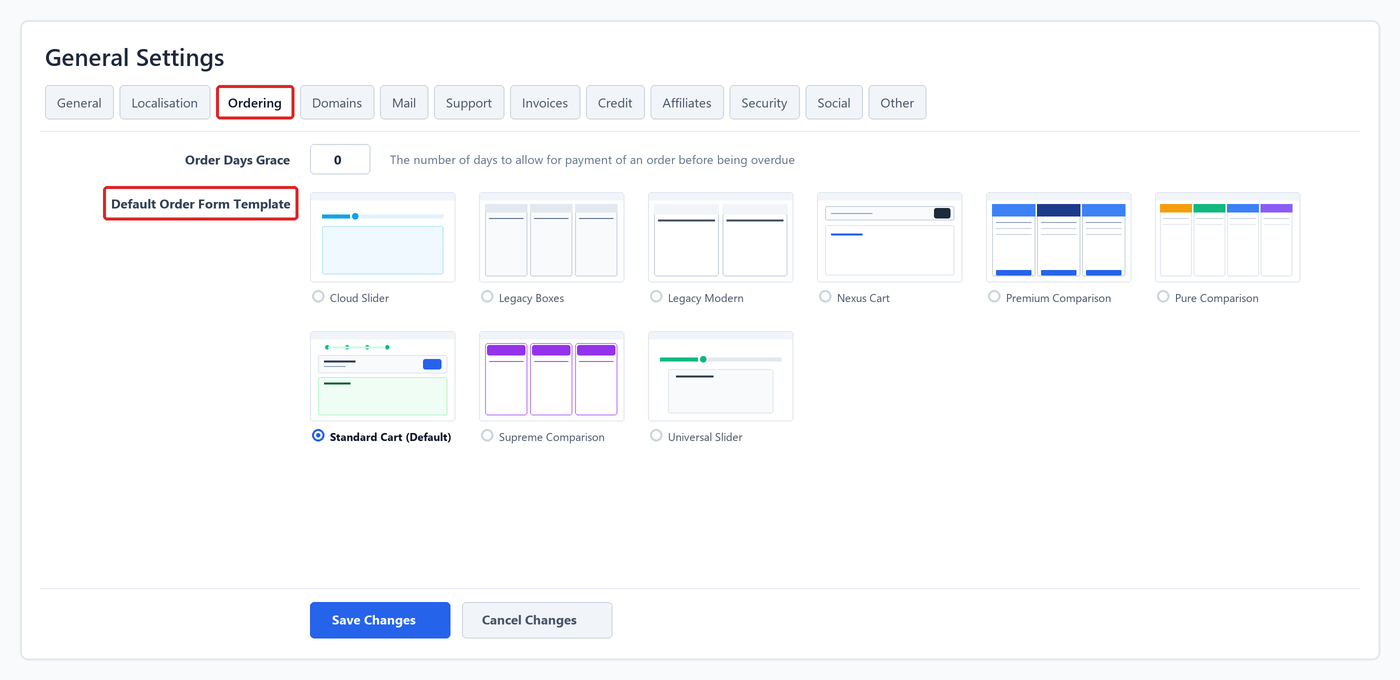
In WHMCS Admin Area, go to System Settings > General Settings > Ordering to choose your Default Order Form Template.
The selected template will be used as the default order form where another template has not been assigned.
Step 9: Assign an Order Form to a Product Group
WHMCS also allows you to use different order form templates for different product groups. This can be useful if you sell different types of hosting or services and want to provide a different checkout experience for each product group.
- Go to Configuration > System Settings > Products/Services.
- Open the required product group and look for the Order Form Template option.
- Choose the option “Use Specific Template”.
- Select the template you want to use and save the changes.
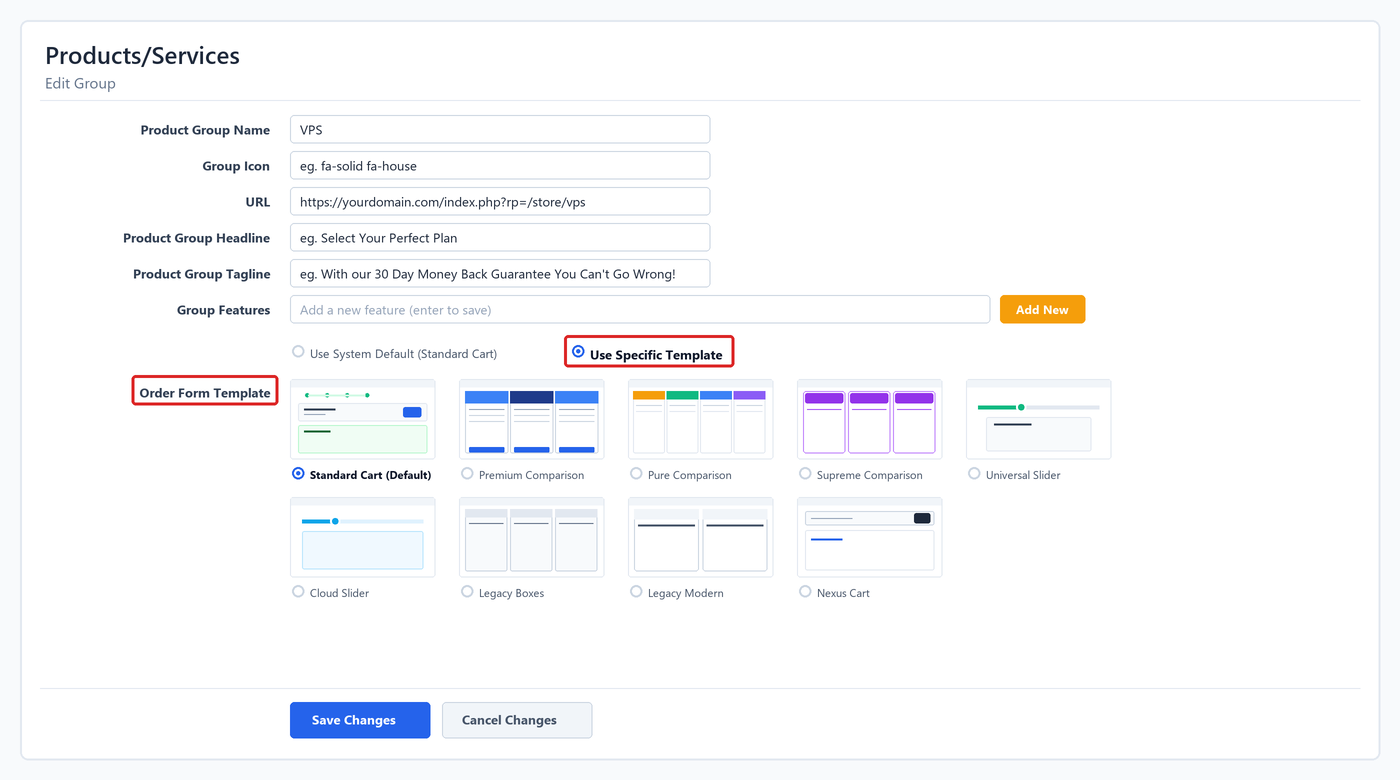
In the WHMCS Admin Area, go to System Settings > Products/Services to assign a specific order form template to a product group.
You can then open the product group order page and check that the correct template is being used.
Step 10: Test the New WHMCS Theme
Do not stop after checking the homepage or Client Area dashboard. A WHMCS theme affects many different pages, so test the complete customer journey.
Check the following pages:
- Client Area login
- Client dashboard
- Services
- Service details
- Domains
- Domain registration
- Domain transfer
- Invoices
- Invoice payment
- Support tickets
- Profile and account settings
- Password reset
- Shopping cart
- Product configuration
- Checkout
- Order confirmation
You should also test the website on different screen sizes:
- Desktop
- Laptop
- Tablet
- Mobile
Pay special attention to the checkout and payment pages because these pages often contain forms, configurable options, payment methods, and third-party integrations.
Preview a WHMCS Theme Before Making It Default
If you are testing a theme, you may want to preview it before changing the default Client Area theme.
For a Client Area theme, you can use:
https://example.com/whmcs/index.php?systpl=mytheme
Replace mytheme with the name of your theme folder.
For an order form template, you can use:
https://example.com/whmcs/cart.php?carttpl=myorderform
Replace myorderform with the name of your order form template.
This is useful when testing a new design without immediately changing the default settings for all customers.
How to Override WHMCS Language Files
If you need to change the text displayed in WHMCS, you can use language overrides instead of editing the default WHMCS language files.
For example, if you want to change a Client Area text such as:
Client Area
Find the corresponding language variable in the WHMCS language file and create an override for it.
Create a Language Override
Do not directly edit the default WHMCS language files located in:
/lang/
For example, avoid making changes directly to:
/lang/english.php
Instead, create a new language file inside:
/lang/overrides/
For example:
/lang/overrides/english.php
Then add only the language strings you want to change:
<?php

$_LANG['clientareahome'] = "My Account";
The exact language variable will depend on the text you want to change.
You can add multiple overrides to the same file:
<?php

$_LANG['clientareahome'] = "My Account";
$_LANG['navservices'] = "My Services";
$_LANG['navtickets'] = "Support";
Important: Always keep your custom language changes inside
/lang/overrides/.
Do not modify the original WHMCS language files directly.
Changes made to the default
/lang/
files can be overwritten during a WHMCS update and can make future maintenance more difficult.
Only add the language variables you need to override rather than copying the complete WHMCS language file.
After adding or updating an override, clear the WHMCS template/cache if the change is not immediately visible and test the affected page.
Common WHMCS Theme Installation Problems
The theme does not appear in WHMCS
If your newly uploaded theme is not available in WHMCS, check:
- The theme folder is inside
/templates/. - The folder name is correct.
- All theme files were uploaded.
- The theme supports your WHMCS version.
- File and directory permissions are correct (directories
755, files644). - There is no extra folder level in the uploaded files.
- If you are using a commercial theme, also check the installation documentation provided by the theme developer.
The theme looks broken
If the theme loads but the design does not look correct, some files may not have been uploaded properly. Check for missing:
- The theme folder is inside
/templates/. - CSS files
- JavaScript files
- Images
- Fonts
- Theme template files
You can also open your browser’s developer tools and check the Console and Network tabs for missing files or JavaScript errors. Clear your browser cache and follow the theme documentation for any WHMCS template or cache-clearing steps (such as emptying /templates_c/).
The order form still shows the old design
The Client Area theme and order form template are configured separately. If your Client Area has the new design but the shopping cart still uses the old design, check the order form settings.
Go to Configuration > System Settings > General Settings > Ordering and confirm that the correct order form template is selected. If you have assigned a different order form to a product group, check the product group’s settings as well.
A WHMCS Module Does Not Match the New Theme
Third-party WHMCS modules may have their own templates, CSS, and JavaScript. Because of this, a module may not automatically match the design of your new WHMCS theme. If this happens, check whether the theme provider offers compatibility for the module you are using. In some cases, additional theme customization may be required.
What to Check After a WHMCS Upgrade
WHMCS upgrades can introduce changes to the default themes, templates, and Client Area functionality. If you are using a custom WHMCS theme, check it after every major WHMCS upgrade.
Pay particular attention to:
- Client Area pages
- Login and registration
- Shopping cart
- Checkout
- Payment pages
- Domain pages
- Support pages
- Custom modules
- Hooks
- Mobile layout
If your theme contains heavily customized template files, review the theme against the latest WHMCS changes before upgrading your production installation. Keeping your customizations separate from WHMCS core files can also make future maintenance easier.
WHMCS Theme Installation Resources
If you are using a WHMCS Global Services theme or checkout template, use the relevant installation documentation before starting the installation.
Hosting & Client Area Themes
- HostX WHMCS Web Hosting Template Installation
- CloudX WHMCS Client Area Hosting Template Installation
- ClientX WHMCS Client Area Template Installation
- TwentyX WHMCS Client Area Template Installation
Checkout and Order Form Templates
Admin Area Themes
The installation process for an Admin Area theme is different from a Client Area theme, so it should be installed according to its documentation.
Final Thoughts
Installing a WHMCS theme or template is usually a straightforward process when the files are uploaded to the correct location and the theme is compatible with your WHMCS version.
The basic process is:
- 1. Download and extract the theme.
- 2. Back up your WHMCS files and database.
- 3. Upload the theme to the correct WHMCS directory.
- 4. Upload any additional files included with the theme.
- 5. Activate the Client Area theme.
- 6. Install and configure the order form template if required.
- 7. Test the Client Area, shopping cart, and checkout.
- 8. Check the theme again after future WHMCS upgrades.
If you are using a third-party WHMCS theme, always follow the installation documentation supplied with the theme. This helps ensure that all required files are uploaded correctly and that the theme works as expected with your WHMCS installation.