⚡ Quick Answer
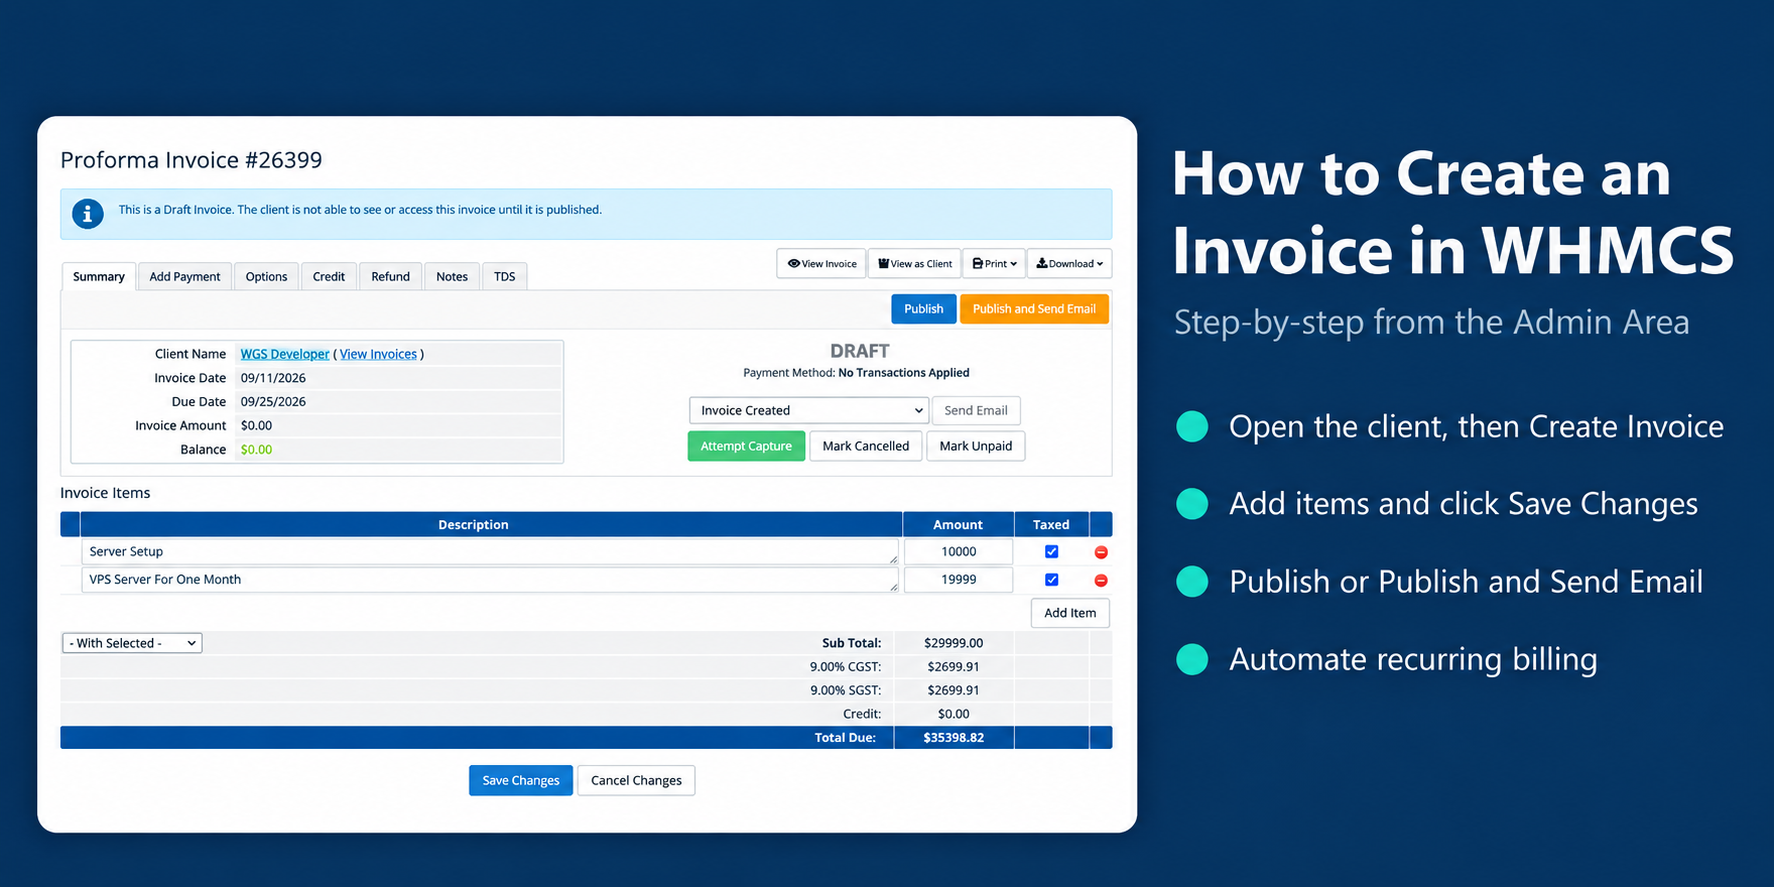
To create an invoice in WHMCS, open the client, go to the Invoices tab, and click Create Invoice.
- Add line items
- Click Save Changes (invoice stays in Draft)
- Click Publish or Publish and Send Email
After publishing, the status becomes Unpaid.
⚠️ Recurring products are invoiced automatically by the daily cron. Do not recreate those manually.
WHMCS is built to create, send, and track invoices for hosting, domains, VPS, licenses, and other charges. Recurring products can invoice themselves. You can also raise a custom invoice for one customer when the charge is not a catalog product.
This guide walks through how to create that invoice, add items, publish and send it, record a payment, refund a paid invoice, set automation and reminders, and make payment easier when the client should not have to log in.
If you need a detailed guide, check what WHMCS is and how the WHMCS billing system works.
What is a WHMCS invoice?
A WHMCS invoice is the bill a customer pays. It lists the products, services, or other charges, the due date, tax, and the amount still outstanding.
You can use WHMCS invoices for:
- Web hosting
- VPS and dedicated servers
- Domain registrations and renewals
- SSL certificates
- Software licenses
- Setup fees
- Maintenance
- Consulting or development work
- Other custom charges
WHMCS generates invoices automatically for recurring services. Admins create custom one-time invoices from the client profile when the work is not a product.
How to create an invoice in WHMCS?
Follow these steps to create an invoice in WHMCS:
Step 1. Log in to the WHMCS Admin Area
Sign in to the Admin Area. Confirm you can open clients and invoices. If you cannot see Billing or a client’s Invoices tab, your admin role is missing those permissions.
Step 2. Select the customer
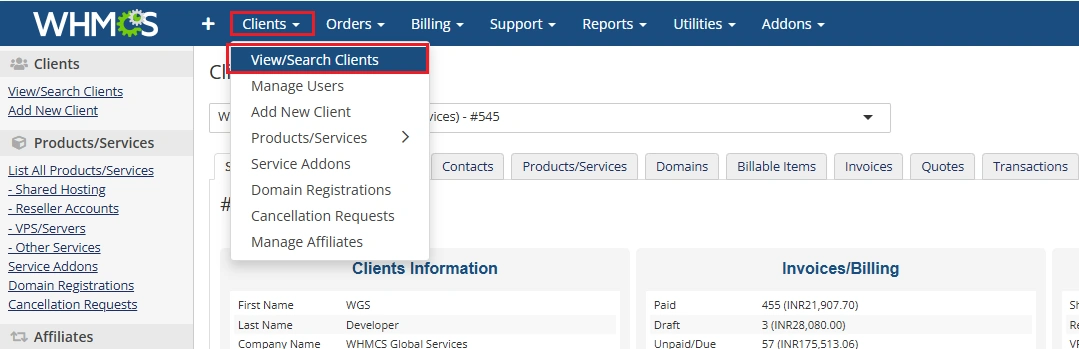
Go to Clients > View/Search Clients or use the header search. Open the customer who should receive the bill. The invoice is stored on that account, with their payments and billing history.
If the person is not in WHMCS yet, add the client first (name, email, billing address, currency). The PDF uses those fields.
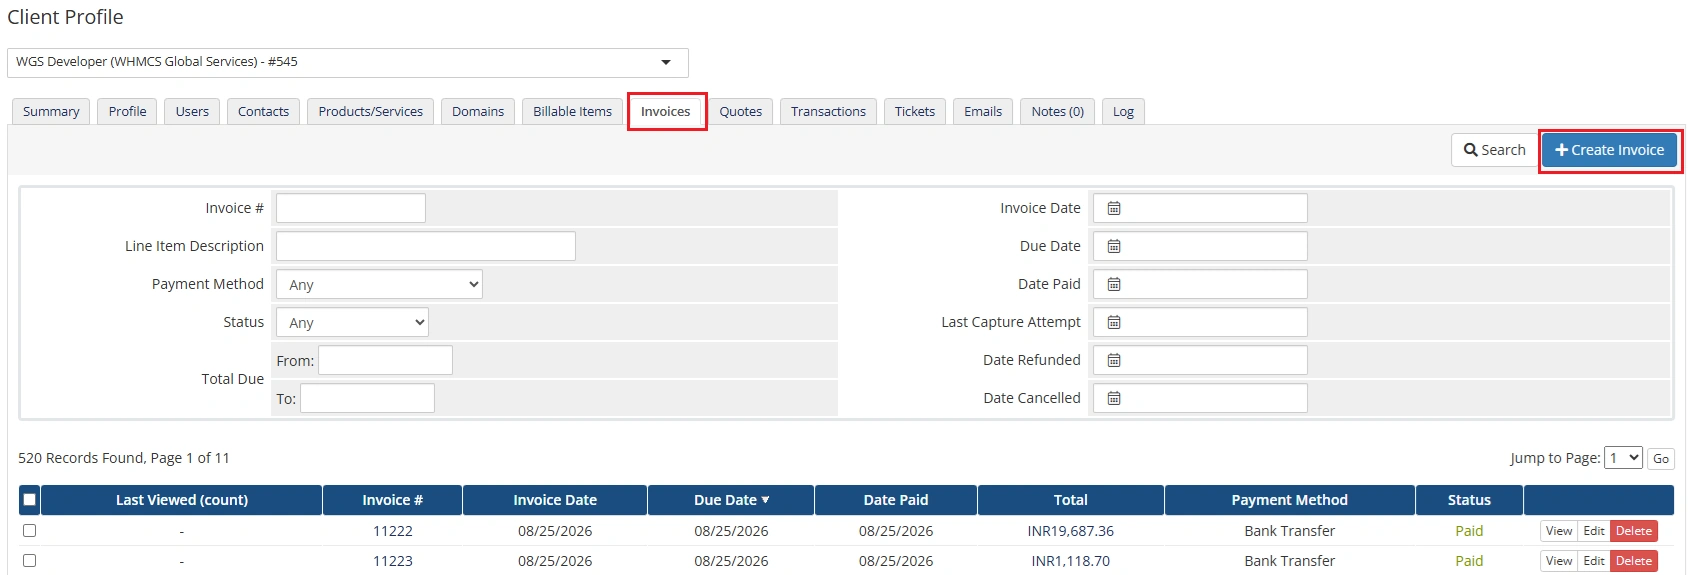
Step 3. Open Invoices and click Create Invoice
On the client profile, open the Invoices tab. Click + Create Invoice. WHMCS opens a new invoice already linked to this customer. You type the charge. You do not have to pick a product from the catalog.
Billing > Invoices are for finding invoices that already exist. Start a new custom invoice from the client, as shown below.
Step 4. Enter the invoice details
WHMCS fills out the dates for you. The invoice date is today. Due date follows Configuration > System Settings > Automation Settings.
To change the invoice date, due date, or payment method, open the Options tab on the invoice. Leave Options alone when the defaults already match your terms. Customer name, address, and email come from the client profile. Fix those on the profile if the PDF is wrong.
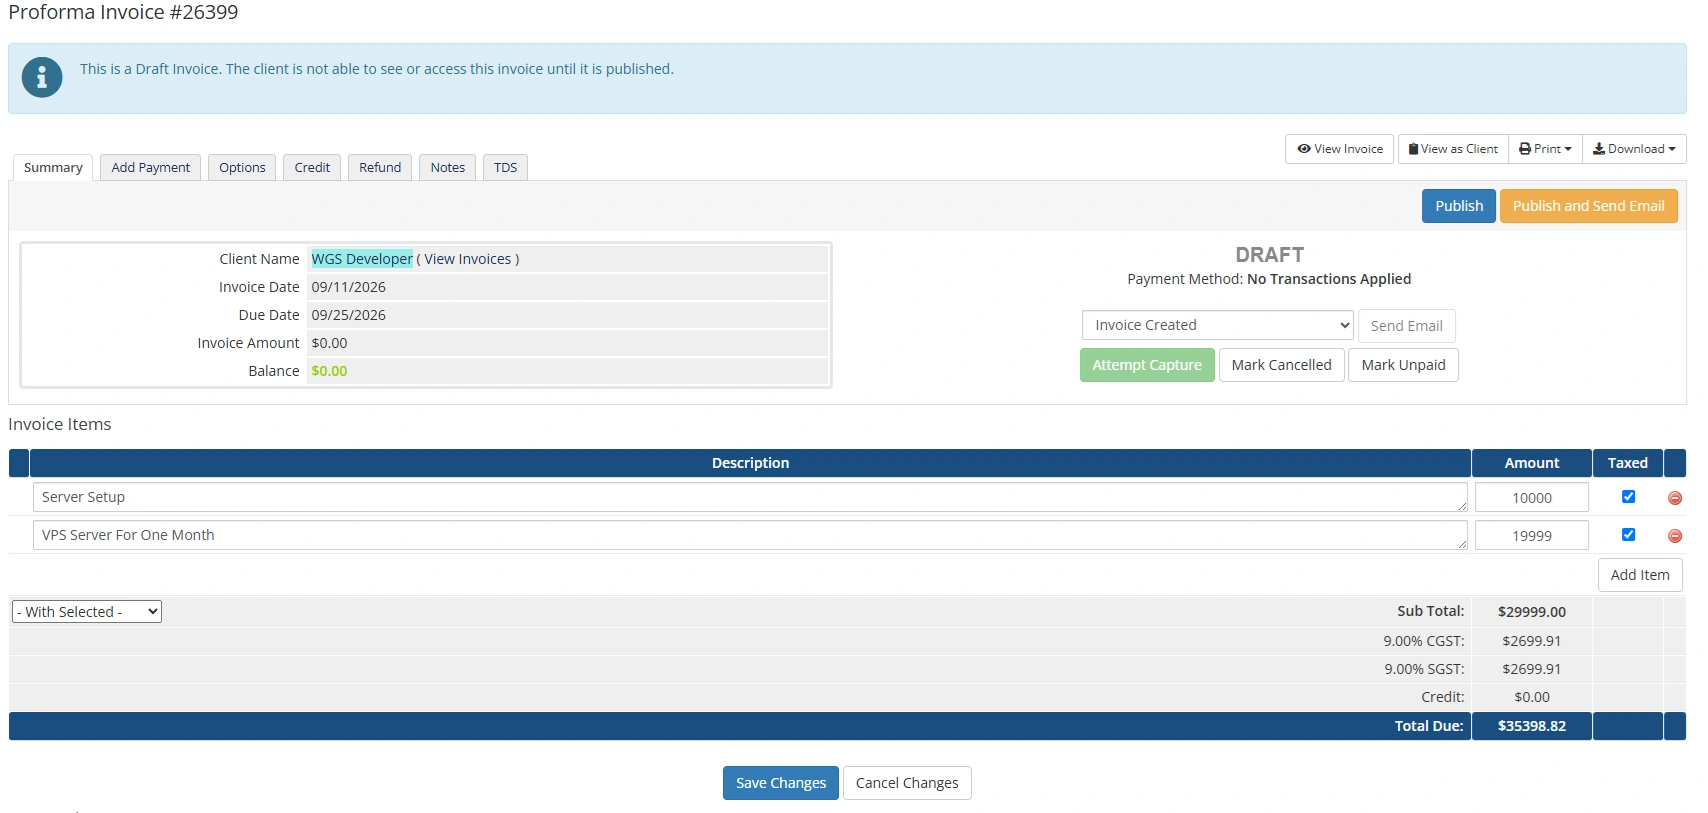
WHMCS saves a custom invoice as a Draft (proforma) until you publish it. The customer cannot see or pay a draft.
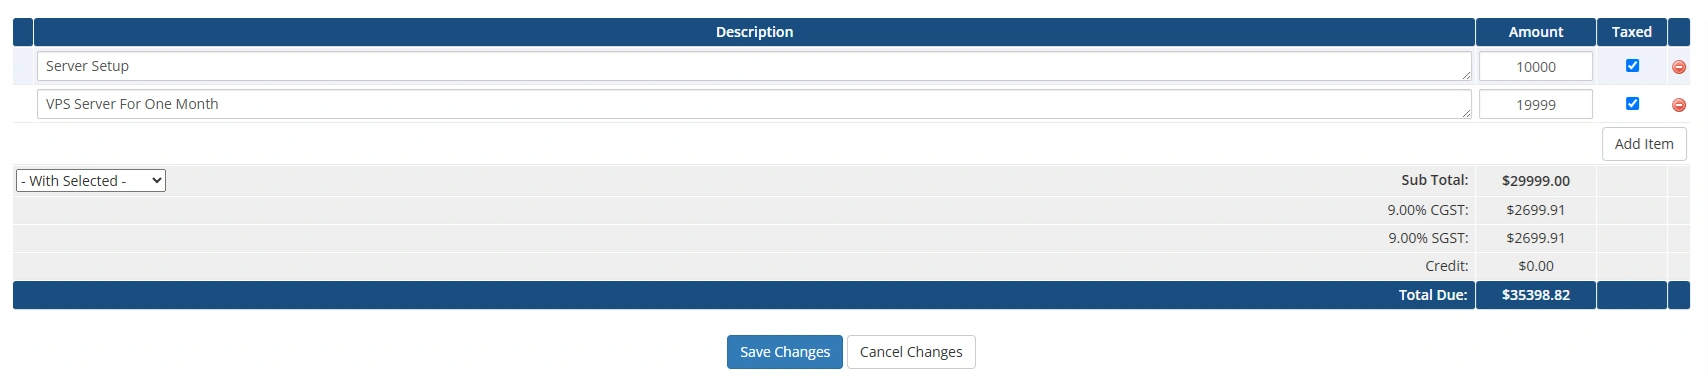
Step 5. Add invoice items
For each line, enter:
- Description
- Amount
- Taxed, if tax should apply to that row
Click Add Item for another row. You can put several charges on one invoice.
Example:
| Description | Amount |
|---|---|
| VPS hosting, monthly | 50.00 |
| Additional IP address | 5.00 |
| Server setup | 25.00 |
Write what the customer will recognize on a PDF. “VPS hosting, 4 vCPU, September 2026” is useful. “Service” is not.
Step 6. Save as Draft and review
Check the customer, dates, items, amounts, tax, any discount, the total, and the payment method. Then click Save Changes.
The invoice stays in Draft. You can still fix a description or amount. Review here, before anyone is billed.
Step 7. Publish the invoice
When the draft looks right, publish it. WHMCS gives you two buttons at the top right:
- Publish and Send Email publishes the invoice and sends the Invoice Created email to the customer’s registered address.
- Publish publishes the invoice with no email. Use this if you still want to check the PDF, or you will send the message later.
After publish, the invoice is Unpaid. The customer can see it and pay it. If you later need a change, cancel and create a new invoice, or apply credit. Do not casually rewrite a bill that already went out.
How to send an invoice to a customer
After you create and publish the invoice, you can email it from the WHMCS Admin Area. Use this if you clicked Publish without sending, or if you need to send the message again.
Step 1. Open the invoice
Go to Billing > Invoices. Search by invoice number and open that invoice. You can also open it from the client’s Invoices tab.
Step 2. Send the invoice email
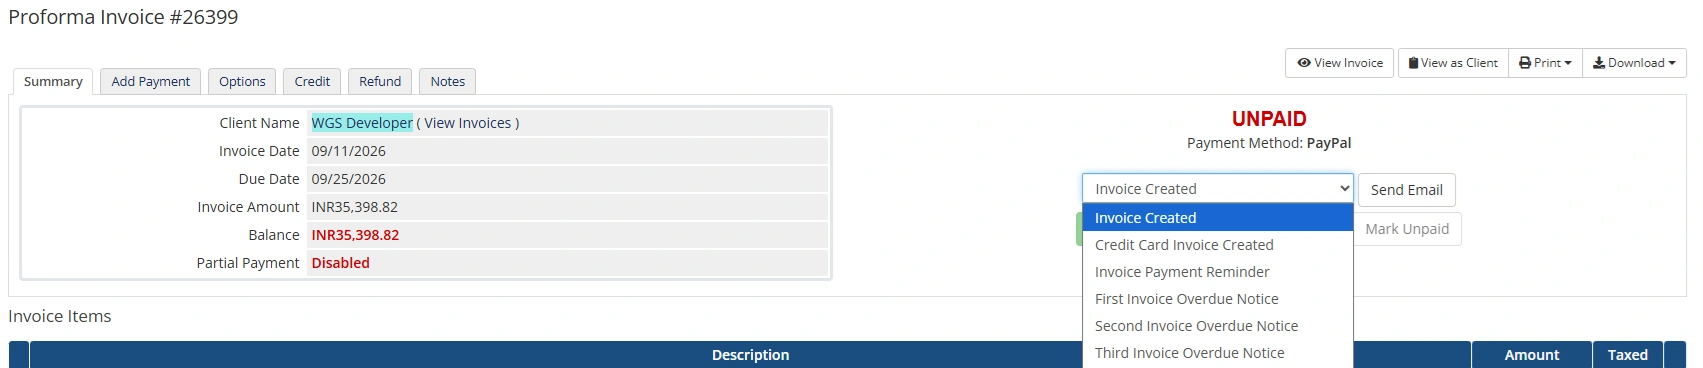
On the invoice screen, find the email template dropdown and the Send Email button.
Select Invoice Created, then click Send Email. WHMCS sends the notification to the customer’s registered email. The message uses your invoice email template and includes the invoice and payment details from this installation.
Step 3. Send an invoice reminder
For an unpaid invoice, pick a reminder template from the same dropdown, then click Send Email. Typical templates are:
- Invoice Payment Reminder
- First Invoice Overdue Notice
- Second Invoice Overdue Notice
- Third Invoice Overdue Notice
Use this when you need a one-off reminder. WHMCS can also send these automatically from Automation Settings (steps below).
How to view and manage WHMCS invoices
Step 1. Open Billing > Invoices
Go to Billing > Invoices. Search by invoice number, client, date, status, or amount. This list is the place to manage invoices that already exist.
Step 2. Open the invoice
From the list, or from the client’s Invoices tab, open the record. You can review:
- Invoice items
- Payments and transactions
- Outstanding balance
- Status (Draft, Unpaid, Paid, Cancelled, Refunded, Collections, Payment Pending)
- PDF, print, and email
You can also open the same invoice from the client profile if you are already on that account.
How to Customise the WHMCS Invoice Template
You can customise the appearance and content of WHMCS PDF invoices by editing the invoice template files in your active WHMCS system theme. This method is available for self-hosted WHMCS installations and is not currently supported for WHMCS Cloud.
Step 1. Log in to the WHMCS Admin Area
WHMCS stores its PDF invoice template in the active system theme. The main file responsible for the PDF invoice is:
| /templates/invoicepdf.tpl |
This file controls the layout and content displayed in the generated PDF invoice.
Step 2: Edit the invoicepdf.tpl File
Open invoicepdf.tpl using a code editor and modify the existing PHP/Smarty template code. You can customise elements such as:
| Element | What it controls |
|---|---|
| Layout | Overall invoice structure |
| Text and labels | Static wording on the invoice |
| Customer information | Name, address, contact details |
| Company information | Your business details |
| Invoice totals | Subtotal, tax, total amounts |
| Invoice items | Line-item listing |
| Images | Logo and other visuals |
| Formatting and styling | Fonts, spacing, colors |
⚡ NOTE
WHMCS generates PDF invoices using TCPDF, so basic knowledge of PHP and the template structure is recommended before making extensive changes.
Step 3: Customise the Invoice Header and Footer
For multi-page invoices, you can create separate header and footer templates:
- invoicepdfheader.tpl
- invoicepdffooter.tpl
Place these files in the same directory as invoicepdf.tpl. WHMCS will automatically include the header or footer on every page of the PDF when the corresponding file exists.
Step 4: Change the Invoice Logo
The PDF invoice logo is stored in:
| /assets/img/ |
Replace the existing logo with your own logo.jpg or logo.png file. You can also adjust the logo width directly in invoicepdf.tpl.
Step 5: Add Custom Invoice or Client Information
WHMCS provides several variables that can be used inside invoicepdf.tpl:
| Variable | Displays |
|---|---|
| $invoiceid | Invoice ID |
| $invoicenum | Custom invoice number |
| $datecreated | Invoice creation date |
| $duedate | Due date |
| $datepaid | Payment date |
| $userid | Client ID |
| $clientsdetails[“firstname”] / [“lastname”] | Client name |
| $companyname | Your company name |
| $companyaddress | Your company address |
| $invoiceitems | Invoice line items |
| $subtotal, $tax, $credit, $total | Invoice amounts |
| $paymentmethod | Payment method used |
| $notes | Invoice notes |
You can also display client custom fields. First configure the relevant custom field under Configuration > System Settings > Custom Fields and select Show on Invoice.
How to record a payment for an invoice
Step 1. Let the gateway record online payments
If the customer pays in the Client Area through a configured gateway, WHMCS should mark the invoice Paid on its own. Do not click Add Payment on top of that. A second manual payment creates duplicates and odd credit.
Step 2. Add a manual payment for bank transfer or cash
If the money arrived outside a gateway, open the Unpaid invoice and use Add Payment. Enter amount, payment date, payment method, and transaction ID. Save. The invoice moves to Paid when the balance is zero.
How to refund an invoice
Only a Paid invoice can be refunded. Draft and Unpaid invoices cannot.
Step 1. Open the paid invoice
From the client profile > Invoices, or Billing > Invoices filtered to Paid, edit that invoice.
Step 2. Use the Refund tab
- Choose the transaction to refund.
- Enter the amount, or leave it blank for a full refund.
- Choose the refund type: through the gateway (if the module supports it), manual refund, or add to the client’s credit balance.
- Tick Reverse Payment if you want WHMCS to undo automated actions that payment triggered, where that is possible.
- Tick send email if the customer should get a confirmation.
- Click Refund.
How WHMCS automatically generates invoices
For recurring products, addons, and domains, you do not click Create Invoice each cycle. The daily cron raises the invoice before the next due date.
Step 1. Open Automation Settings
Go to Configuration > System Settings > Automation Settings (WHMCS 8 and later). Older builds used Setup > Automation Settings.
Step 2. Set invoice generation
Find Invoice Generation. The usual default is 14 days before the due date. The cron must be running or nothing generates.
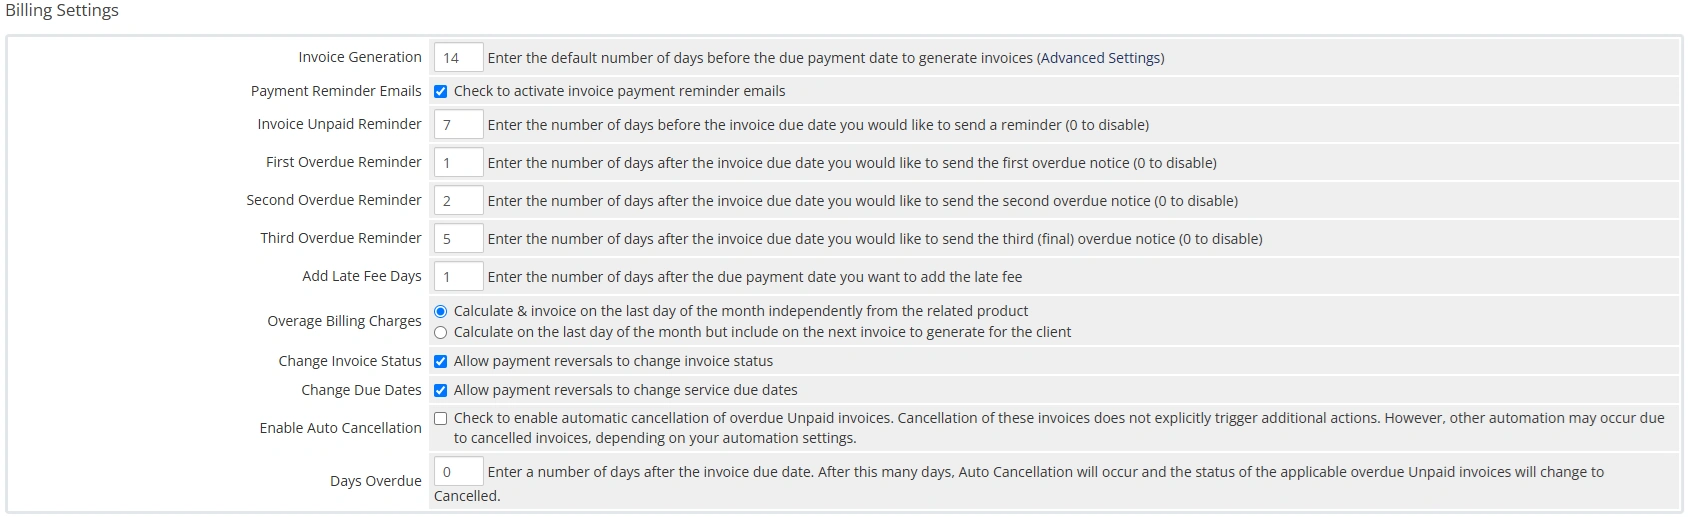
Step 3. Adjust by billing cycle if you need to
Use Advanced Settings to generate monthly, quarterly, and annual invoices on different lead times. Annual invoices often go out earlier because customers need more notice.
Generation will not run if the service is already invoiced for that period, terminated, or has invoicing disabled.
Need recurring custom invoices without creating products?
WHMCS can recur Billable Items on month-based cycles. That still lives on the client. If you want custom recurring invoices without creating a product or service, including a 7-day cycle, use the WHMCS Recurring Invoice Management module.
Admins create the recurring invoice in the admin area. The module generates the next invoices on the cycle you pick: 7 days, monthly, quarterly, semi-annually, or annually. That fits maintenance, consulting, management fees, and similar charges that should not be catalog products. More on weekly billing: can you raise weekly recurring invoices in WHMCS?
How to set up WHMCS invoice payment reminders
Step 1. Stay in Automation Settings
The reminder fields are in the same Billing Settings block as invoice generation: Configuration > System Settings > Automation Settings.
Step 2. Set the reminder days
WHMCS can send one reminder before the due date and up to three overdue notices after. Enter the number of days for each, or 0 to disable that notice. Late fees, if you use them, are configured here too.
Step 3. Save and rely on the cron
Save the settings. Reminders send when the daily cron runs. This cuts manual follow-up and helps on-time payment.
How to make WHMCS invoice payments easier
Creating the invoice is half the job. The customer still has to pay. In default WHMCS they open the Client Area, log in, then pay. That stalls when they forgot the password, or when an accountant needs to pay and was never given a login.
WHMCS does not include a built-in “pay this invoice without logging in” flow. You need an addon for a direct pay link.
Pay WHMCS invoices without login
The Invoice Pay Without Login module creates a secure payment link for that invoice. You can send the link to the customer or to the person who actually pays. They open it and pay. They do not get the rest of the Client Area.
What it is useful for:
- Pay without a Client Area login
- Share a direct pay link with an accountant or finance team
- Add the pay link (and optional QR code) to invoice emails
- Let customers scan a QR code on a phone
- Track when a link was opened
- Track when a link was opened
Use this after Publish and Send Email so the message can carry a pay link instead of a login wall. Invoice Pay Without Login for WHMCS
WHMCS invoice best practices
Use clear descriptions: Prefer “VPS hosting, 4 vCPU, 8 GB RAM, September 2026” over “Service charge.” Accounting teams should understand the line without a ticket.
Check tax and discounts before you publish: Confirm tax ticks, discounts, and the total while the invoice is still Draft.
Set a due date that matches your terms: If the auto due date is wrong for this bill, change it on the Options tab before you publish.
Automate recurring products: Do not clone last month’s hosting invoice by hand. Let Automation Settings and the cron do it. Use recurring billable items or the Recurring Invoice Management module only for custom charges that are not products.
Make payment easy: A published invoice that requires a forgotten password will sit Unpaid. A direct pay link helps when the payer does not need full Client Area access.
Conclusion
WHMCS covers one-time and recurring invoices from the Admin Area. Create a custom invoice on the client, add items, save as Draft, review, then Publish or Publish and Send Email. Recurring products invoice themselves from Automation Settings. Reminders cut follow-up. Record gateway payments automatically and Add Payment only for bank transfer or cash.
When you need more than core WHMCS, the Recurring Invoice Management module raises custom recurring invoices without extra products, and Invoice Pay Without Login lets the customer or a third party pay from a link instead of the login screen.