
A vague “Oops! Something went wrong” message, a completely blank page, or a 500 Internal Server Error in your WHMCS admin or client area or during WHMCS Installation rarely tells you anything useful on its own. WHMCS’s debugging tools exist to change that, they surface the actual PHP or SQL error behind the message so you (or your developer) know exactly what broke and where. Here’s how to turn them on, where to look once they are, and why you should never leave them on longer than you need to.
Key Takeaways
- Enable debugging from the WHMCS Admin Area whenever you have access.
- Use Display Errors only when necessary, as it exposes error details on-screen.
- Log Errors, SQL Debug Mode, and Hooks Debug Mode are safer alternatives for production environments.
- If you cannot access the admin panel, enable debugging by adding $display_errors = true; to the configuration.php file.
- If no errors appear even after enabling debugging, review your server’s PHP error_reporting settings.
- Check the Activity Log and Module Log to find detailed error information.
- Different debugging tools are designed for different issues, such as database, hooks, SMTP, or payment gateway errors.
- Always disable debugging after troubleshooting to prevent exposing sensitive server information.
What Usually Causes These Errors
Before diving into debugging settings, it helps to know what’s typically behind a blank page, a partially rendered page, or an “Oops!” message. The most common causes include:
- Missing, corrupted, or incompletely uploaded files.
- A server that doesn’t meet WHMCS’s minimum system requirements.
- PHP, Apache, or ionCube Loader®-related errors.
- Incompatible hooks or addon modules.
- Syntax errors in custom modules, hooks, or templates.
Enabling error reporting won’t fix any of these on its own, but it will tell you which one you are dealing with, which is most of the battle.
Method 1: Enable Debugging from the WHMCS Admin Area
This is the method WHMCS recommends by default, and the one to try first whenever you can still log in.
- Log in to your WHMCS Admin Area.
- Go to Configuration >> System Settings >> General Settings (in WHMCS versions prior to 8.0, this is under Setup >> General Settings).
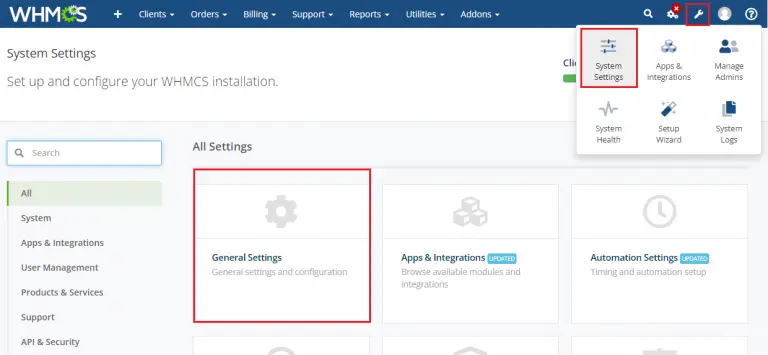
- Open the Other tab.
- Tick the relevant debugging option(s), then click Save Changes.

| Option | What it does |
| Display Errors | Shows PHP errors directly on the page. Best for blank pages, partially rendered pages, and the generic “Oops!” message. |
| Log Errors | Writes PHP errors to the Activity Log instead of showing them on-screen, safer to leave on briefly since visitors won’t see the output. |
| SQL Debug Mode | Logs MySQL query errors and warnings. Use this first if you suspect a database-related issue. |
| Hooks Debug Mode | Logs custom hook calls, useful when a custom module or addon is misbehaving. |
Once saved, reload the page where the error occurred. WHMCS will now render the full error detail (if Display Errors is on) or write it to the Activity Log (if Log Errors is on), which you can then share with your developer or module vendor.
Which one should you enable first? Log Errors and SQL Debug Mode usually capture the same information Display Errors would show, without exposing anything to site visitors. Reach for Display Errors only if those don’t turn up anything useful, and keep in mind that once it’s on, it will show the same error detail to anyone else who happens to load that page, not just to you. Avoid enabling it for visitors or non-privileged staff whenever you can.
Where to find the logged output
If you enabled Log Errors, SQL Debug Mode, or Hooks Debug Mode instead of (or alongside) Display Errors, the results won’t show up on the page, you’ll need to check:
- Activity Log: Configuration >> System Logs >> Activity Log, for general system activity and logged errors/warnings.
- Module Log: Configuration >> System Logs >> Module Log, for errors involving payment gateways, provisioning modules, or domain registrar modules.
Method 2: Enable Debugging via configuration.php
If you can’t access the Admin Area at all, you can enable Display Errors directly in the configuration file.
- Connect to your WHMCS installation via FTP, cPanel File Manager, or Plesk File Manager.
- Make a backup copy of configuration.php before editing it.
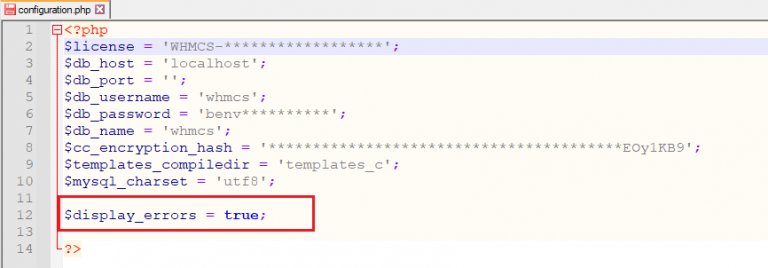
- Open configuration.php in your WHMCS root directory and add the following line before the closing ?> tag:
$display_errors = true;
- Save the file and re-upload it if you edited it locally.
- Reload the page that was previously erroring out.
| Worth knowing: the Admin Area’s Display Errors setting takes precedence over this configuration.php value. If you have enabled it from the config file but it doesn’t seem to be taking effect, check whether it’s explicitly disabled in the Admin Area first. |
If Errors Still Aren’t Showing: Check Server-Level PHP Settings
Occasionally, WHMCS’s own Display Errors setting is on, but you still aren’t seeing the detail you need. That usually means the error_reporting level in your server’s PHP configuration is set too high, suppressing warnings before WHMCS can display them. This is a hosting-environment setting, not a WHMCS one, so where you fix it depends on your control panel.
cPanel (via WHM)
- Log in to WHM.
- Go to Software >> MultiPHP INI Editor.
- Click the Editor Mode tab and select the PHP version your WHMCS installation uses.
- Scroll to the error_reporting setting.
- Set it to: E_ALL & ~E_WARNING & ~E_USER_WARNING & ~E_NOTICE &~E_USER_NOTICE & ~E_STRICT & ~E_DEPRECATED &~E_USER_DEPRECATED (this shows as the numeric value 4597 once saved correctly).
- Save your changes.
Plesk
- Log in to Plesk and select the domain running WHMCS.
- Go to Websites & Domains.
- Open PHP Settings (found under Hosting Settings in Plesk Onyx/Obsidian, or under Website Scripting and Security in Plesk 12.x).
- Adjust the error_reporting and display_errors values as needed for your PHP version.
- Save your changes.
If you are on shared or reseller hosting without WHM/root access, you’ll typically need to ask your hosting provider to adjust this for you.
Match the Debugging Option to the Type of Issue
Display Errors and SQL Debug Mode won’t be the right tool for every problem. Depending on what you are actually troubleshooting, one of these targeted options may get you there faster:
- Database errors: SQL Debug Mode, covered above.
- Custom hook or addon issues: Hooks Debug Mode, also covered above.
- Email sending problems: SMTP Debugging, found in the same Other tab, logs the conversation between WHMCS and your mail server.
- Payment gateway or provisioning module errors: these are recorded separately in the Module Log (Configuration >> System Logs >> Module Log) rather than the general Activity Log.
| Security note: Debugging output can expose file paths, database structure, and other details about your server to anyone who loads the erroring page, including visitors, not just you. Always switch Display Errors, Log Errors, SQL Debug Mode, and Hooks Debug Mode back off as soon as you have captured what you need, and avoid raising server-level PHP error reporting on a production environment for longer than a troubleshooting session. |
Conclusion
Debugging mode in WHMCS is one of the quickest ways to identify the root cause of errors instead of relying on vague messages like “Oops! Something went wrong” or a blank page. Whether you are dealing with PHP errors, database issues, custom hooks, or third-party modules, enabling the appropriate debugging option can significantly reduce troubleshooting time.
Whenever possible, use Log Errors, SQL Debug Mode, or Hooks Debug Mode before enabling Display Errors, as they provide valuable insights without exposing sensitive information to visitors. Once you have identified and resolved the issue, remember to disable all debugging options to keep your WHMCS installation secure and running efficiently.